App Inventor Stop Watch
Hello friends and welcome to Obsidian Soft,
Normally, in all mobile devices, stopwatch, timer, and alarm clock features are all rolled into one app called the Clock. I have already taught how to make an alarm clock and countdown timer but I haven’t taught how to make a stopwatch.
.png)
The difference between a timer and a stopwatch is that a timer counts down from the time given and a stopwatch counts up from 0 until you stop it. A stopwatch is a good way of finding out how long you take to do something and is a must for all test givers especially people taking tests like their SATs.
Let’s have a look at the screenshot of what we are making today:

As you can see this stopwatch app looks quite professional and counts in minutes, seconds, and centiseconds just like Android’s built-in stopwatch. It also has a resume feature which should be a must feature in all good stopwatches.
So, let’s begin…
Open up MIT App Inventor:
https://ai2.appinventor.mit.edu/
Go to Projects in the menu bar and choose Start New Project.
Name the project “StopWatch”, no spaces are allowed in the project name.
The Designer view of the project will open where we design the screen.
For screen1 properties on the right, make align horizontal: center, background color: white, screen orientation: portrait and turn off the title visible check box.
From the Layout palette on the left, drag and drop a Horizontal Layout onto the device showing in the center.
For horizontal arrangement1’s properties, make align horizontal and align vertical both center. Make height: 30% and width: fill parent.
Duplicate horizontal arrangement1 by selecting it and pressing Ctrl + C and Ctrl+ V on the keyboard for Windows OR Command + C and Command + V on the keyboard for MacOS.
From the User Interface Palette, drag and drop a Label inside horizontal arrangement1 in viewer. Rename to timeLbl and make font: bold, font size: 45, and change text to “00 : 00 : 00”.
From the User Interface Palette, drag and drop a Button inside horizontal arrangement2 in viewer. Rename to resetBtn. Make background color: light gray, font: bold and font size: 20. Make width: 30%, shape: rounded, text: Reset, and textColor: Dark Gray.
Duplicate the resetBtn by selecting it and pressing Ctrl + C and Ctrl+ V on the keyboard for Windows OR Command + C and Command + V for MacOS. Rename to startStopBtn. Make background color: blue, text: Start and textColor: white.
Add an empty label between the two buttons for spacing. Make width 2% and remove all text from it.
Lastly, From the Sensors Palette, drag and drop a Clock onto the Viewer. This is an invisible component. In the Clock1’s properties, turn off timer enabled checkbox but the timer always fires should stay on (this means that our stopwatch should keep on working if the app is open but not on screen). Make timer interval: 10 milliseconds which actually means 1 centiseconds. So, we want our clock to be triggered after every one centisecond.
Our screen design is done so let’s go to the blocks section.
We have three global variables. startTime and pausedTime are for storing the actual device time at which the clock is started or paused respectively and timerStarted is a variable maintained to switch between the start and stop state of the stopwatch’s startStop button.

We will also make a procedure for converting single digits to a number with 0 before it. So, for example, 1 second will be displayed as 01 to keep the look of our timer uniform.
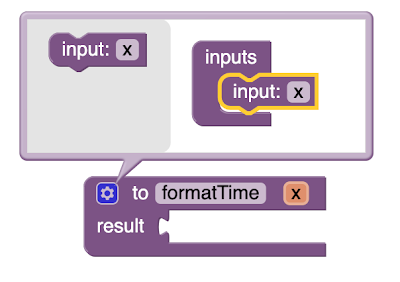
From procedures, get the procedure that returns a result. Name it “formatTime”.

Click on cogwheel in this procedure to add an input to it.
From control, get the if-else block below the while test block as shown below:
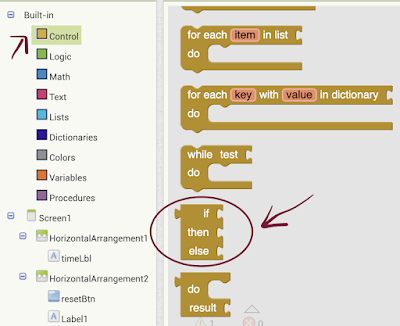 Plug it inside the formatTime procedure.
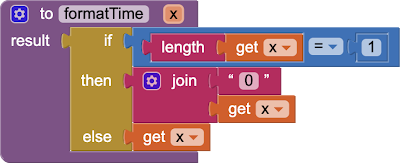
Now, check if x’s length is equal to 1 then join 0 and x otherwise let x stay the same.
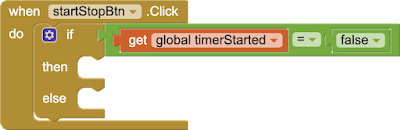
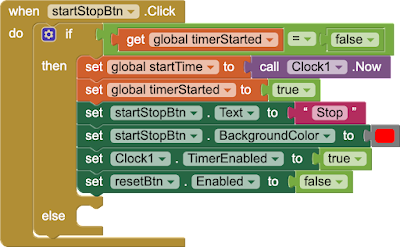
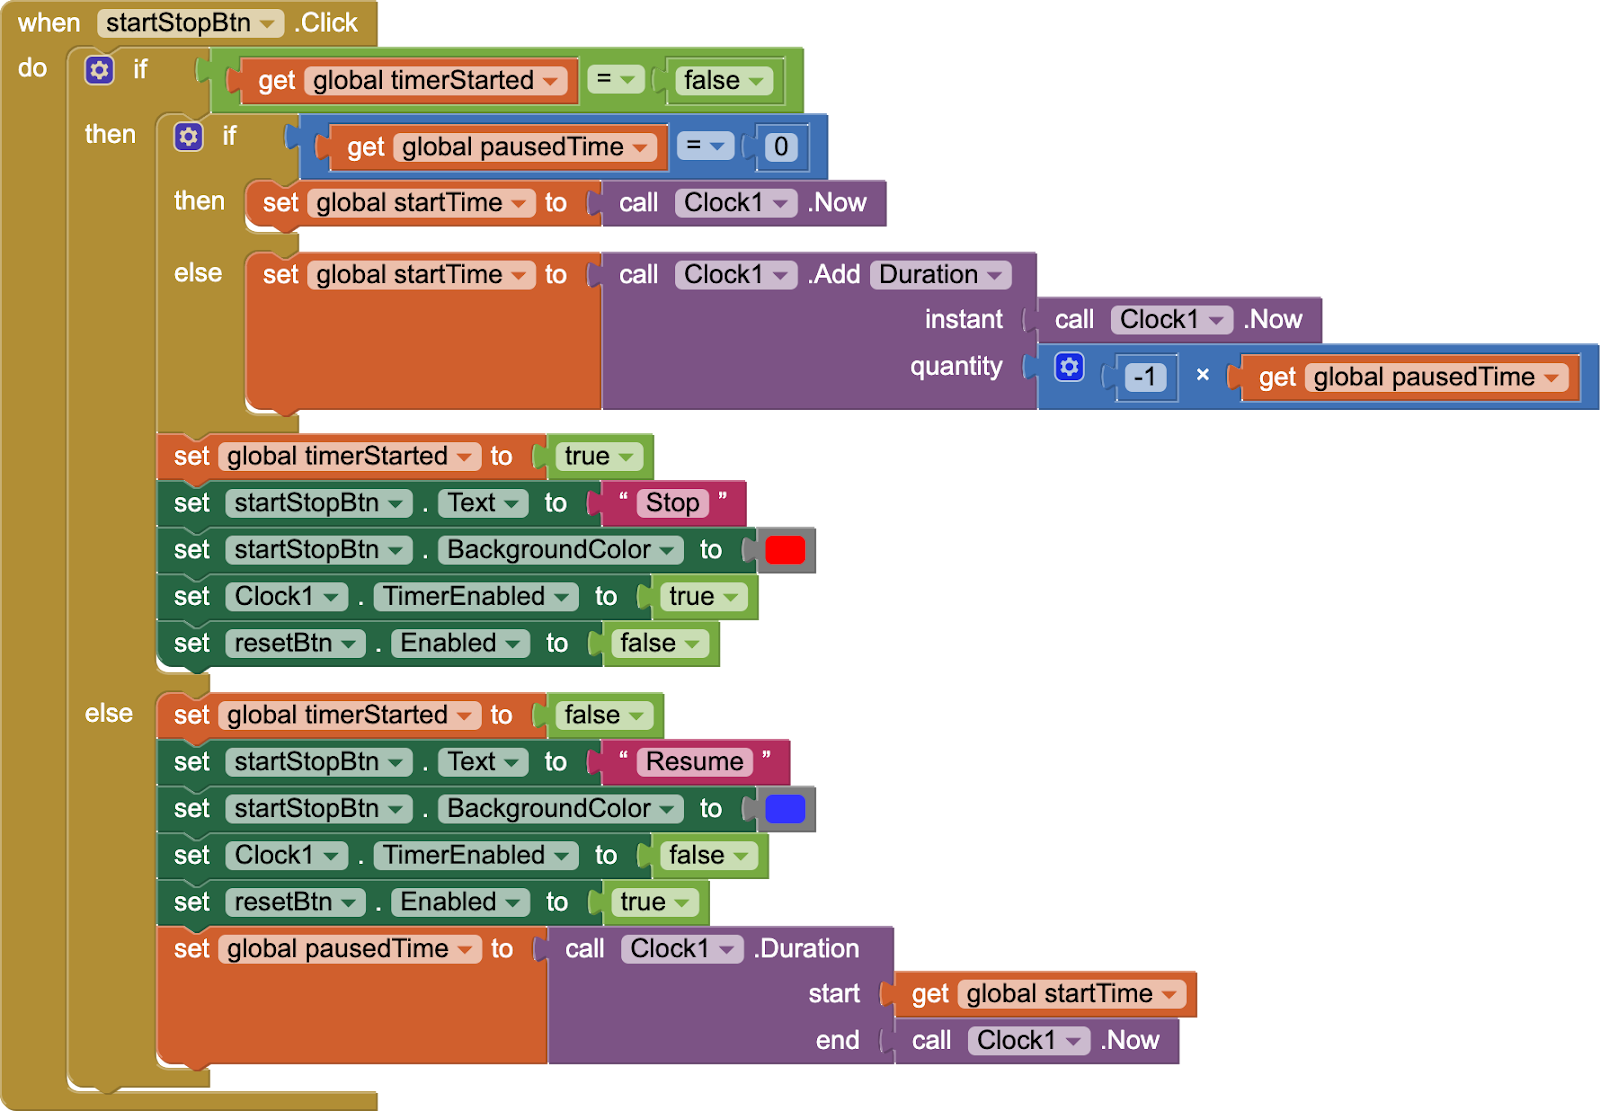
Now, get the click event of startStopBtn and use an if/else block from control to check in if condition that timerStarted=false. This is the case when the timer hasn’t started yet, so we should start it. In else section, we will add code for stopping the timer.
So, what should happen when the timer is started. We should assign the current device time to startTime using Clock. Now procedure. We should set the status variable timerStarted to true. We should change the text on our startStopBtn to Stop and we should change its background color to red. And most importantly we should enable our clock’s sensor time. And we should also disable our resetBtn. The stopwatch should only be allowed to be reset when we stop it.
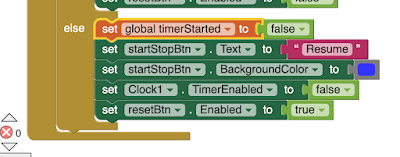
And what happens in the else section: we stop the timer by making timerStarted false, startStopBtn’s text Resume, and color back to blue. We disable our clock’s timer and we enable resetBtn.
Let’s work on our clock’s timer event code.
We will find the duration between the device’s current time and the time at which the stopwatch was started and we will show this time duration in minutes, seconds, and centiseconds and this will be updated every 1 centisecond as that is the timer interval for our clock (10 milliseconds = 1 centisecond)
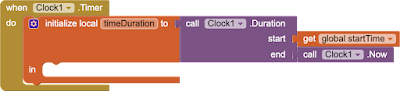
In the clock1’s timer event block, first, add a local variable timeDuration and use Clock1’s duration procedure to find the duration between startTime and Clock1.Now. This timeDuration is returned to us in milliseconds.
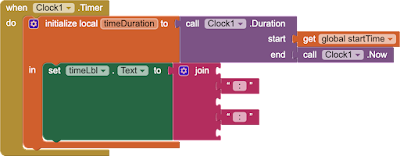
Within the orange section of the local variable, set the timeLbl to the join of 5 blocks in which plug in " : " text blocks as separators between mins, seconds, and centiseconds.
Now, we have these procedures in the clock that convert a duration into minutes and seconds:


However, if we consider the seconds one, it will give us the entire duration in seconds so it can even give us 220 seconds but we don’t want to show 220 seconds to the user as 220 seconds has 3 minutes and 40 seconds in it. So, how to fix this? Just take thhe modulo of seconds with 60. So, 220 % 60 is 40 (modulo returns the remainder of a division)
So, do this for both minutes and seconds slots but besides the modulo, we have to call our custom procedure formatTime to add a 0 before single digits.
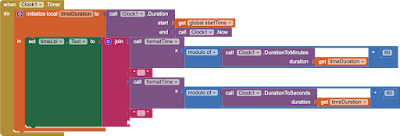
The last slot is for centiseconds which is a little trickier as we don’t have a procedure for converting duration to centiseconds so we will find it using our own code i.e. take modulo with 1000 (our time duration is already in milliseconds) and divide by 10 to get centiseconds. We need rounding off too before formatTime.
Our final timer event looks like this:

Next is our resetBtn code:

If you test the timer right now, it will function very nicely but instead of resuming, the timer will start from 0 again. So, what do we need for the resuming feature?
In our startStopBtn click event, inside the else section, start storing the time duration at which the stopwatch was stopped:

Once we have the duration at which stopwatch was paused, we need to subtract it from the current device time when the clock is started again and we will only do it if the pauseTime isn’t 0. If pausedTime = 0, then this means that the stopwatch is either being started after a reset or it is being started for the first time

(There is no Subtract Duration procedure in clock sensor, so we can get the correct subtraction result by multiplying pausedTime by -1 and then adding this to current time).
So our final startStopBtn click event looks like this:
The stopwatch app is done and I hope you liked this tutorial.
If you like my classes, consider supporting me by buying me a cup of coffee by pressing the button below:

You can download aia file for the project from here:
You can also watch the video tutorial on my channel: Obsidian Soft.


Comments
Post a Comment