Calculator in MIT App Inventor
Hello friends and welcome to Obsidian Soft,
In this tutorial, we are making a simple calculator in MIT App Inventor.

Open MIT App inventor. Make a new project. Call it a calculator.
Let’s design its screen.
We need one vertical layout and then we need multiple horizontal layouts for the various buttons.
In screen 1 properties, make screen orientation portrait. Change the title to Calculator and turn off the status bar.
Drag and drop a vertical arrangement from Layout onto the Viewer.
Rename the vertical arrangement to calcScreen. Make it fill parent in terms of width and make its height to be 40%. Make align horizontal to be right as we want the numbers in it to come on the right. Make align vertical to be center. Make the background color black.
Now add two labels to it. Rename the top label to question and make it font size 50 and font color light grey and empty the text. Rename the bottom label to answer and make its font size 60 and font color white. Empty its text too.
Drag and drop a horizontal arrangement from Layout. Make its width fill parent and height 12 %. Make it align horizontal center and align vertical center. Make the background color cyan.
Number 7, 8, 9 and division buttons will go in the topmost horizontal arrangement.
First, add the button for number 7 by dragging a button from User Interface inside the horizontal arrangement. Rename it to sevenBtn. Make its text 7. Font bold and font size 35 and shape rounded. Make the width of the button 23%. Make its background color light grey. Add a label after it with a width of 2% and no text. This is to put a gap between all buttons.
Select sevenBtn. Duplicate it by pressing Ctrl +C and Ctrl +V for Windows and Command + C and Command + V for MacOS. Rename to eightBtn and make its text 8. Add a label after eightBtn with width 2% and no text. You can also duplicate the label that you put after sevenBtn instead of making it from scratch.
Similarly, add nineBtn and space and then the divide button to the right of nineBtn. Go to google chrome. Write divide symbols and copy-paste ÷ that into the text. By the way, you might have difficulty putting the last button because it will be hidden in the viewer so choose monitor size for the viewer to see the buttons for editing.

We are done with the first row of buttons:


Now, select this horizontal arrangement. Duplicate it. Bring it below the 7, 8, 9, ÷ arrangement. Rename the buttons to fourBtn, fiveBtn, sixBtn, and multiplyBtn. Change the text on them accordingly:

Duplicate this arrangement and bring it below the 4, 5, 6, x arrangement. Rename the buttons to oneBtn, TwoBtn, ThreeBtn and minusBtn. Change the text on them accordingly.

Duplicate the horizontal arrangement again and bring it below the 1, 2, 3, - buttons arrangement.
Rename to zeroBtn, clearBtn, decimalBtn, and plusBtn and change text to 0, AC, . and + respectively. Make AC and . orange.

Duplicate the horizontal arrangement again and bring it below the 0, AC, .,+ buttons arrangement. Delete everything from it except one button. Rename it to equalBtn. Make its width 50% and change text to =. Make its color orange.

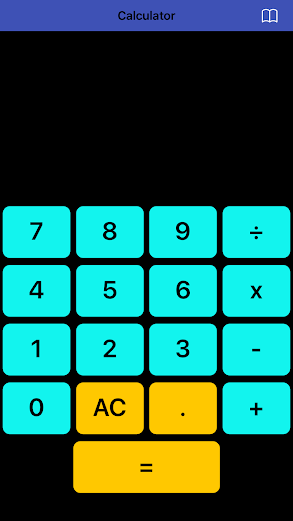
The Screen design is done. If you connect it to the device using the MIT App Inventor Companion app, it should look like this:
Now, go to the Blocks section for writing the code.
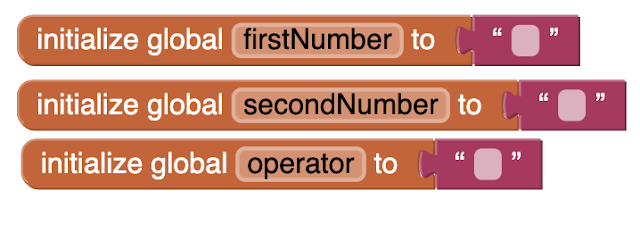
Add a global variable. Name it firstNumber. Make it assigned to a empty text block. Right click on the block and choose duplicate. Name it secondNumber. Duplicate. Name it operator. The reason we are making the numbers strings/texts is that we want each digit to be added at the end of each number when a number key is pressed. We will not be able to do it if we make these global variables numbers.
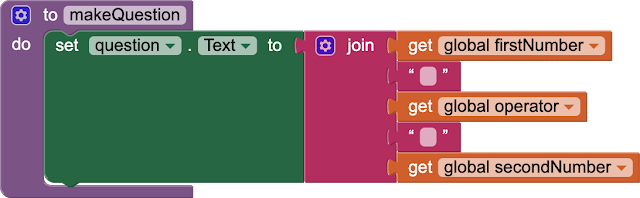
Make a procedure by dragging the first type of procedure from the purple Procedure blocks. Rename it to makeQuestion. Set the question in calcScreen to a join of firstNumber by using get variable block, empty text block, operator by using get variable block, empty text block, and secondNumber by using get variable block.
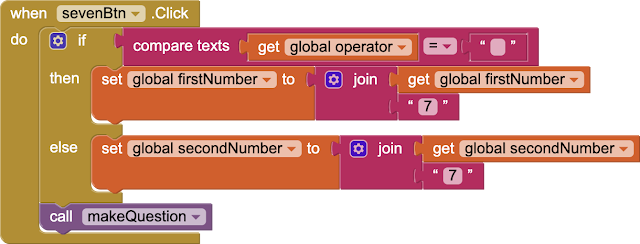
Now, whenever any number key is pressed such as sevenBtn, we will check if our operator is empty by comparing text using a compare text block from the text section. If it is empty then this means that our first number is still not completed. So we take whatever is inside the firstNumber variable and join 7 to it. In the else situation, we do the same thing for the secondNumber because this means that the operator has been provided and we are supposed to record the second number.
In the end, update the screen by calling makeQuestion.
Duplicate the sevenBtn click event by right-clicking on it and choosing duplicate. Change it to oneBtn by choosing oneBtn instead of sevenBtn in the dropdown

Change the code in the oneBtn click event accordingly i.e. change the text to 1.

Do the same thing for all the remaining number buttons and also the decimal button but do you see a problem here? We can add multiple decimal points in our numbers here so this means we need to add a check to avoid more than one decimal points within the same number.
So, let’s add another global variable. Name it decimalAdded. Make it false by using a green logic block.

Inside our decimalBtn click event, we will first check if decimalAdded is false, and only then, we will allow a decimal point to be joined with the first number or second number. After joining it, we will also make decimalAdded to true so that a second decimal point can’t be added.
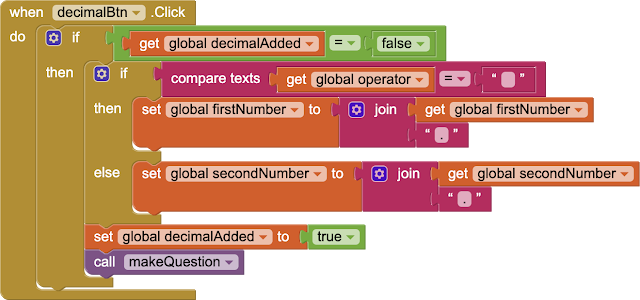
So, when to allow the decimal to be added again? We can allow it to be added by making decimalAdded false when any of the operator buttons has been pressed (an operator being provided means that we are ready to record the secondNumber)
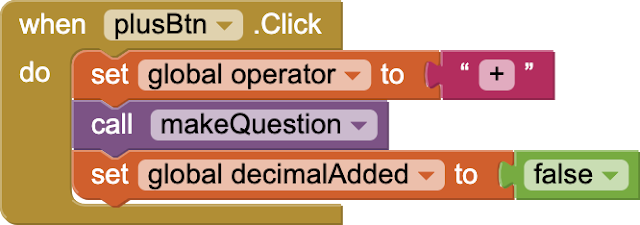
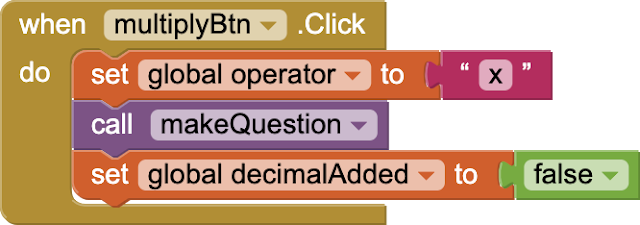
So, in all our four operators' click events, we set the operator variable accordingly. We call makeQuestion procedure and we also set decimalAdded to false.
Do you see the advantage of having a procedure here?


Now, what should be the code inside the AC button that is clearBtn.
We need to clear up all our global variables i.e assign them empty strings. Make decimalAdded back to false. Clean up the answer and call makeQuestion so that our question is also cleared up on the calcScreen.

Now, let’s come to a little difficult part of our app i.e. the equal button code. We have to check for a few things. If we don’t check for such things then we will introduce a bug in our app. A bug is a problem or issue in coding.
So, first, we must check that when an equal button is clicked, the secondNumber should not be empty because a plus, minus, divide or multiply can’t be performed on only one number: the secondNumber is needed so it shouldn’t be empy. Use the compare text block from the Text section and do a not equal to comparison with an empty text block.
Once we know it is not empty, we can look at the operator, do the operation, and set the calculated value to the answer label.
So, get the third version of control blocks i.e. the nested if block and put inside our first if condition block.

Right now, it has if, else if, and else structure. Click on the cogwheel to get another else if inside it.

It will look like this once you drag the else if from left-hand side to the right-hand side.

Start checking for operators by comparing the text of the operator with relevant symbols. Make sure that you check correctly and use the exact text that you used when setting up the operator variable in the operator’s click event.
After each check, use the maths function to perform the operation on the first and second numbers and set the result to the answer label’s text.

Be careful when it is division. You can’t divide by zero so take care of this situation when the second number is 0.
Check if the secondNumber is 0 and if it is, set answer label to Not a number.

At the end, set the firstNumber to the calculated answer i.e. the answer label for future calculations and make the operator and second number empty. Also, make decimalAdded false. The final equalBtn click event looks like this:

You can also download aia file for this simple calculator app:
And, you can also have a look at the video tutorials here.
Please like my videos and share it with your friends and family. Also, subscribe to my channel and press the bell icon so you don't miss any of the great projects I have planned for you.
Please like my Facebook page and Instagram page for more educational resources and tips.
Facebook: https://www.facebook.com/ObsidianSoft/
Instagram: https://www.instagram.com/obsidiansoftapps/
Pinterest:
https://www.pinterest.co.uk/obsidiansoft/_created/
For links to free educational apps, have a look at the educational apps page


Comments
Post a Comment