Compass App in MIT App Inventor
Hello friends and welcome to Obsidian Soft.
In today’s class, I will teach you how to turn your Android device or iPhone into a compass.
So, let’s begin.
Create a new project and call it CompassApp. For screen 1 properties, make align horizontal center and align vertical center. Also, this is super important that you make the screen orientation portrait.
Now, we need a nice, vibrant compass image for our app. You can use whatever compass image you like from the internet but use an image with a transparent background and a square size i.e. the length and the width are equal.
I used this image from freepik.com.
Image by rawpixel.com on Freepik

I removed the background by using the free site remove.bg: a really helpful site that I frequently use. I also reduced its size to 500 by 500 pixels as it is a good app development practice not to use huge images. You can reduce image sizes by using Paint on Windows or Preview on MacOS.
There are also free online websites available that can help you in resizing an image.
Upload the resized compass image with the transparent background in your compass app project. Now, drag and drop a Canvas from Drawing and Animation onto the viewer.
Give it a background color of your choice. I am going to give it a black color. Make height and width fill parent.
Drag and drop an Image Sprite from Drawing and Animation onto the canvas.
Choose the uploaded compass image as the picture. Don’t change any of the properties. Drag and drop a Notifier from the User Interface. Also, drag and drop an Orientation Sensor from Sensors.
The screen design is done. Let's go to the blocks section.
When the screen is initialized, we have to align our compass image properly on the screen so drag and drop screen1’s initialize event. Inside, first set the size of the image to have the same height and width as the canvas. This will make sure that the image displays completely and utilizes all the space available. Also, make the x and y positions such that the image comes in the center of the screen. This can be achieved by dividing the width of the canvas by 2 to get the x position but we have to consider the width of the image in this calculation too so this is the resulting formula:
X position = canvas.width /2 - imageSprite.width/2
Do the same thing for y and change the width to height.
Y position = canvas.height /2 - imageSprite.height/2
Next, check if the device has an orientation sensor and use the notifier to show alert if it isn’t available.

The orientation sensor determines how much the device is tilted but it also has an azimuth property. Azimuth is 0 degrees when the top of the device is pointing north, 90 degrees when it is pointing east, 180 degrees when it is pointing south, 270 degrees when it is pointing west, etc. Hence, we use this to make our compass operate so if it is not available, the compass will not work.
The actual compass code is very simple now.
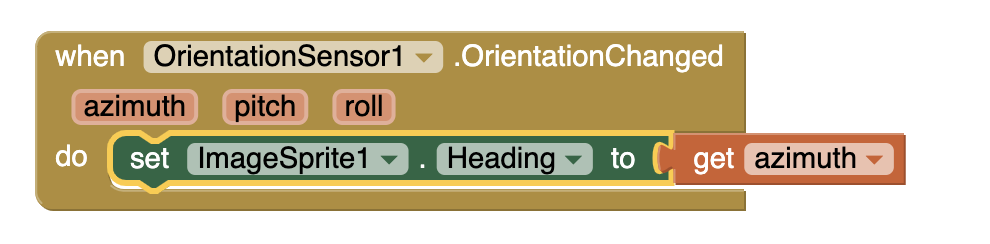
Whenever the orientation of the device changes, change the compass image heading to azimuth.
We are done and you can see that such simple code has resulted in such a cool app. I hope you will have fun making this app and impressing your friends and family. Thank you for reading 🙂.
You can also download the project file (aia) from here:
You can have a look at the video here:


Comments
Post a Comment