MIT app inventor music player app
Hello friends and welcome to Obsidian Soft
Today, I will teach you how to make a Music Player app in which we can load songs from our device into our app, make a playlist, and play, pause, stop, go to the previous song, and the next song just like any professional music player app.
Our final app will look something like this:
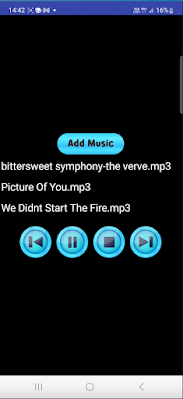
As you see in the demo, the list view contains the names of the songs. To get this song name from the chosen music file, we need an extension.
So, let’s download the extension from this link.
https://community.kodular.io/t/filetools-some-tools-to-work-with-files/40051
We need to log in first so log in using Google account.
Download the aix file.
Also, I downloaded some very nice player images from Freepik:


Today, I will teach you how to make a Music Player app in which we can load songs from our device into our app, make a playlist, and play, pause, stop, go to the previous song, and the next song just like any professional music player app.
Our final app will look something like this:
As you see in the demo, the list view contains the names of the songs. To get this song name from the chosen music file, we need an extension.
So, let’s download the extension from this link.
https://community.kodular.io/t/filetools-some-tools-to-work-with-files/40051
We need to log in first so log in using Google account.
Download the aix file.
Also, I downloaded some very nice player images from Freepik:


https://www.freepik.com/free-vector/music-player-icons_849181.htm
I also designed an Add Music button using a similar theme in Adobe Illustrator:
Import the extension by clicking on Extension in the Palette section of Designer View and then, choosing Import Extension. Choose the downloaded aix file and after it is successfully imported, drag and drop it onto the viewer.

Import all buttons in the media section (I reduced the button sizes to 66 by 66 pixels as the original ones were too large)
For screen1, make align horizontal and align vertical both center.
Make the background color black.
Drag and drop a FilePicker component from the Media palette.
Make height 45 and width 140 pixels. I am putting in this size as this is the size of my uploaded image for this component.
Choose the appropriate uploaded image.
Drag and drop a listview from the user interface below this button.
Make width fill parent and height: 20%.
Drag and drop a horizontal arrangement from the layout palette below the list view. Make width fill parent. And align horizontal and align vertical both center.
Drag and drop a button from the user interface inside this horizontal arrangement.
Rename to prevBtn. Make height and width both 66 pixels and remove text from it.
Select prevBtn. Duplicate it by pressing Ctrl + C and Ctrl + V on the keyboard for Windows
OR Command + C and Command + V on the keyboard for MacOS.
Rename to playPauseBtn. We will toggle between the two states of playing and pausing using the same button.
Choose the play image as the image for it.
Again duplicate, rename to stopBtn, and choose the appropriate image.
Duplicate one last time, rename to nextBtn, and choose the appropriate image.
Drag and drop a notifier from the user interface. We will use it to show messages to users.
Drag and drop a Player component from Media.
I also designed an Add Music button using a similar theme in Adobe Illustrator:
Now, create a new project and call it MusicPlayer.
Import the extension by clicking on Extension in the Palette section of Designer View and then, choosing Import Extension. Choose the downloaded aix file and after it is successfully imported, drag and drop it onto the viewer.
Import all buttons in the media section (I reduced the button sizes to 66 by 66 pixels as the original ones were too large)
For screen1, make align horizontal and align vertical both center.
Make the background color black.
Drag and drop a FilePicker component from the Media palette.
Make height 45 and width 140 pixels. I am putting in this size as this is the size of my uploaded image for this component.
Choose the appropriate uploaded image.
Drag and drop a listview from the user interface below this button.
Make width fill parent and height: 20%.
Drag and drop a horizontal arrangement from the layout palette below the list view. Make width fill parent. And align horizontal and align vertical both center.
Drag and drop a button from the user interface inside this horizontal arrangement.
Rename to prevBtn. Make height and width both 66 pixels and remove text from it.
Select prevBtn. Duplicate it by pressing Ctrl + C and Ctrl + V on the keyboard for Windows
OR Command + C and Command + V on the keyboard for MacOS.
Rename to playPauseBtn. We will toggle between the two states of playing and pausing using the same button.
Choose the play image as the image for it.
Again duplicate, rename to stopBtn, and choose the appropriate image.
Duplicate one last time, rename to nextBtn, and choose the appropriate image.
Drag and drop a notifier from the user interface. We will use it to show messages to users.
Drag and drop a Player component from Media.
Our screen design is done so let’s go to the blocks section.
Let’s define the global variables
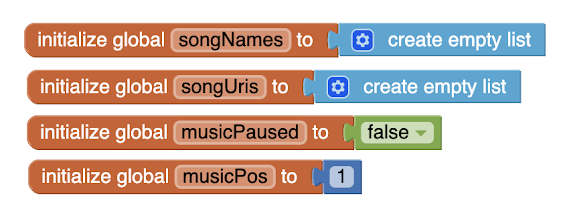
musicPos is for maintaining the next and previous song in our list. musicPaused is for knowing that when play button is pressed, should we start the music from the very beginning or from where it was paused?
And we need two lists for maintaining uris of songs and their names.
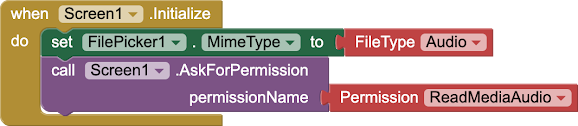
When screen is initialized, first we set filePicker mimetype i.e. media typpe to Audio and we also ask for permission for reading media of type audio. The AskForPermission procedure call is inside Screen1 blocks.
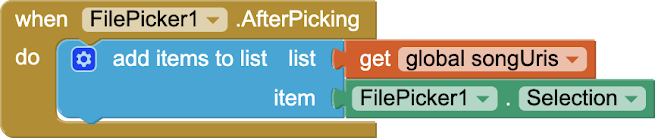
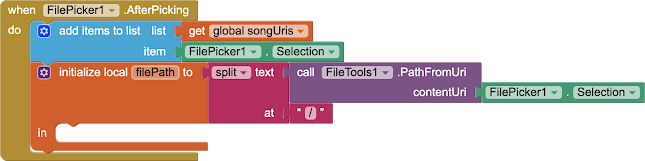
After the user has used the filePicker to choose music, the AfterPicking event of the filePicker component will be triggered so add the file picker’s selection i.e. music file chosen by the user to the songUris list.
Next is the reason why we need an extension.
Let’s define the global variables
musicPos is for maintaining the next and previous song in our list. musicPaused is for knowing that when play button is pressed, should we start the music from the very beginning or from where it was paused?
And we need two lists for maintaining uris of songs and their names.
When screen is initialized, first we set filePicker mimetype i.e. media typpe to Audio and we also ask for permission for reading media of type audio. The AskForPermission procedure call is inside Screen1 blocks.
After the user has used the filePicker to choose music, the AfterPicking event of the filePicker component will be triggered so add the file picker’s selection i.e. music file chosen by the user to the songUris list.
Next is the reason why we need an extension.
(*if you want the app to work using the Companion app on an iPhone, give some text like Song 1, Song 2 as song names instead of using the extension)
We need the extension to get the file name or song name from the URI.
We need the extension to get the file name or song name from the URI.
When the user chooses a song using the file picker, the file picker's selection property is set to the URI of that music file.
We can use this URI to get the file path using the extension and from that file path, we can eventually get the file name.
So, make a local variable for filepath.

Now, we can get the path from URI (filepPicker.selection) using the extension’s PathFromUri procedure.

This path is like this: /storage/emulated/0/Music/Some song name.mp3 and we are interested in only the song name. So, we can split this path wherever ‘/’ comes using Text’s Split block and assign this to the filePath.
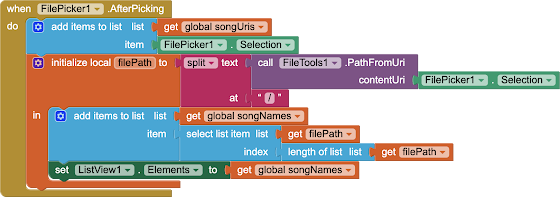
Our filePath local variable is now a list containing items:
And we are interested in only the last item that is actually at index 6 which is also the length of our filePath list.
So, get that last item which is the music name, and add it to our songNames list and also update the listview with the songNames list.
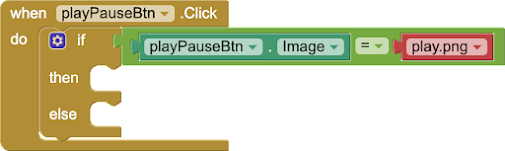
Now, we have to work on our music player buttons.
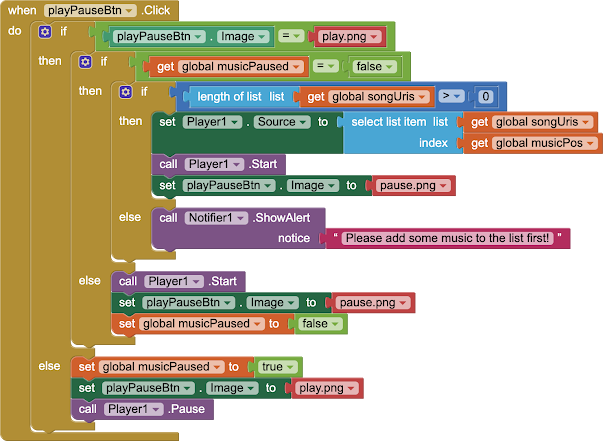
Get the playPause Btn click event. We have two situations:
Either the icon on the button is the play one or the pause one.
So put in an if else block from control and check for this condition.
If playpause button was pressed while the play icon is showing on it, then this means we should start playing some music but we need to also know if the music was paused so that we can resume it so check for musicPaused variable. If it is false, we need to start music from the very beginning. We also need to check if the user has added some songs or not and if not, we have to show an alert using notifier.

If the musicPaused variable is true, we will go in the else condition and just start the player without setting the source again.
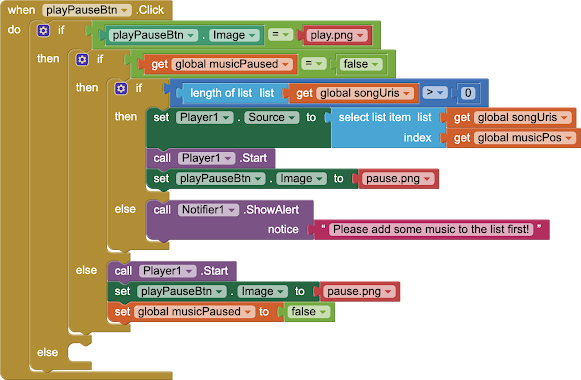
The last else block is for the situation where the icon on the button is pause so we need to pause the music and change the icon to the play icon.
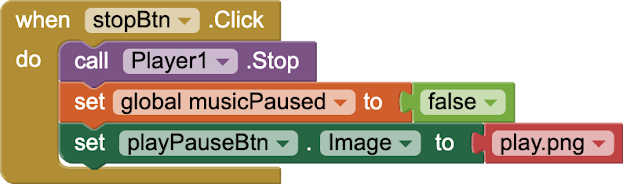
Now, the stop button code is fairly simple.
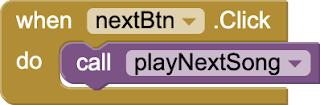
What happens when the player finishes one song and has to start playing the next item in the playlist i.e. musicUris.
The code will be the same as the next button code.
So, let’s make a procedure for this to avoid repetition of similar code. For playing the next song, we need to check if we still have at least one song left for playing and then, we increment musicPos and play the song corresponding to the incremented musicPos.

Call this procedure from both the next button click event and the player completion event.

Our previous button code is similar to our procedure but this time, we have to subtract one from musicPos but we only do it if there is a previous song in the playlist and we aren’t already on the first song.

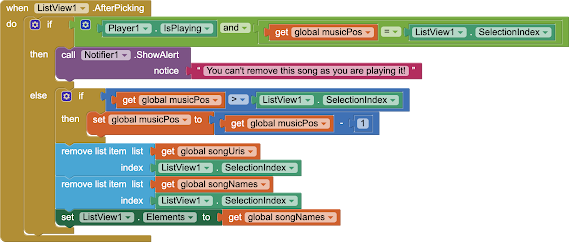
Last but not least, I added code for deleting items from the playlist i.e. listview by tapping on it. I used the same method in the shopping list app.
Here, we need to delete from two lists and also update our musicPos. For example, we are playing song no. 4 and the user deletes song no. 2 so our musicPos should now become 3 instead of 4. We only have to do this if the user deletes a song that is in a position less than the music Pos. If the user deletes song no. 6 and we are playing song. 4 then our musicPos isn’t affected by this change and it will stay 4.
We are done and I hope you liked this tutorial.
You can further enhance this app by storing the songUris and songNames in TinyDB so that your playlist is there when you open your app again. Just remember to load the lists from tinyDB in Screen initialize and store them in TinyDB again wherever you are making changes to them such as adding items to them or removing items from them.
Have fun coding this app.

Please like my videos and share them with your friends and family. Also, subscribe to my channel and press the bell icon so you don't miss any of the great projects I have planned for you.
Now, we can get the path from URI (filepPicker.selection) using the extension’s PathFromUri procedure.
This path is like this: /storage/emulated/0/Music/Some song name.mp3 and we are interested in only the song name. So, we can split this path wherever ‘/’ comes using Text’s Split block and assign this to the filePath.
Our filePath local variable is now a list containing items:
- Storage
- Emulated
- 0
- Music
- Some song name.mp3
And we are interested in only the last item that is actually at index 6 which is also the length of our filePath list.
So, get that last item which is the music name, and add it to our songNames list and also update the listview with the songNames list.
Now, we have to work on our music player buttons.
Get the playPause Btn click event. We have two situations:
Either the icon on the button is the play one or the pause one.
So put in an if else block from control and check for this condition.
If playpause button was pressed while the play icon is showing on it, then this means we should start playing some music but we need to also know if the music was paused so that we can resume it so check for musicPaused variable. If it is false, we need to start music from the very beginning. We also need to check if the user has added some songs or not and if not, we have to show an alert using notifier.
If the musicPaused variable is true, we will go in the else condition and just start the player without setting the source again.
The last else block is for the situation where the icon on the button is pause so we need to pause the music and change the icon to the play icon.
Now, the stop button code is fairly simple.
What happens when the player finishes one song and has to start playing the next item in the playlist i.e. musicUris.
The code will be the same as the next button code.
So, let’s make a procedure for this to avoid repetition of similar code. For playing the next song, we need to check if we still have at least one song left for playing and then, we increment musicPos and play the song corresponding to the incremented musicPos.
Call this procedure from both the next button click event and the player completion event.
Our previous button code is similar to our procedure but this time, we have to subtract one from musicPos but we only do it if there is a previous song in the playlist and we aren’t already on the first song.
Last but not least, I added code for deleting items from the playlist i.e. listview by tapping on it. I used the same method in the shopping list app.
Here, we need to delete from two lists and also update our musicPos. For example, we are playing song no. 4 and the user deletes song no. 2 so our musicPos should now become 3 instead of 4. We only have to do this if the user deletes a song that is in a position less than the music Pos. If the user deletes song no. 6 and we are playing song. 4 then our musicPos isn’t affected by this change and it will stay 4.
We are done and I hope you liked this tutorial.
You can further enhance this app by storing the songUris and songNames in TinyDB so that your playlist is there when you open your app again. Just remember to load the lists from tinyDB in Screen initialize and store them in TinyDB again wherever you are making changes to them such as adding items to them or removing items from them.
Have fun coding this app.
I hope you liked this tutorial.
If you like my classes, consider supporting me by buying me a cup of coffee by pressing the button below:
You can also watch the video here:
Please like my social media pages for more educational resources and tips.
Facebook: https://www.facebook.com/ObsidianSoft/
Instagram: https://www.instagram.com/obsidiansoftapps/
Pinterest:
https://www.pinterest.co.uk/obsidiansoft/_created/
For links to free educational apps, have a look at the educational apps page


Comments
Post a Comment