Qibla Finder or Location Finder App in MIT App Inventor
Hello friends and welcome to Obsidian Soft.
In today’s class, I will teach you how to turn your Android device into a Qibla app. A qibla app is an app that points toward Kaaba (the holiest place for muslims around the world). They have to pray five times a day while facing Kaaba so having a qibla app is a must in their lives. However, you can turn this app into your home finder or some other location direction app too by providing a different longitude and latitude. We will use the longitude and latitude of Kaaba located in Makkah, Saudi Arabia.
.png)
So, let’s begin.
Create a new project and call it QiblaApp. For screen 1 properties, make align horizontal center and align vertical center. Make the screen orientation portrait.
I will upload a compass image and an arrow image. Use a square compass image with a transparent background.
You can download the compass image from here: https://www.freepik.com/free-vector/illustration-compass_2807758.htm You can remove the background of the image by using: https://www.remove.bg/
Drag and drop a Label from the User Interface and rename it to addressLbl. Now, drag and drop a Canvas from Drawing and Animation onto the viewer. Make height and width 500 pixels.
Drag and drop an Image Sprite from Drawing and Animation onto the canvas. Rename to compassImg and choose the uploaded compass image as the picture. Make height and width fill parent.
Drag and drop another Image Sprite from Drawing and Animation onto the canvas. Rename to arrowImg and choose the uploaded arrow image as the picture. Make height 150 pixels and width 84 pixels.
Drag and drop an Orientation Sensor from Sensors.
Drag and drop a location sensor from sensors and choose 1000 as timeinterval.
The screen design is done. Let's go to the blocks section.
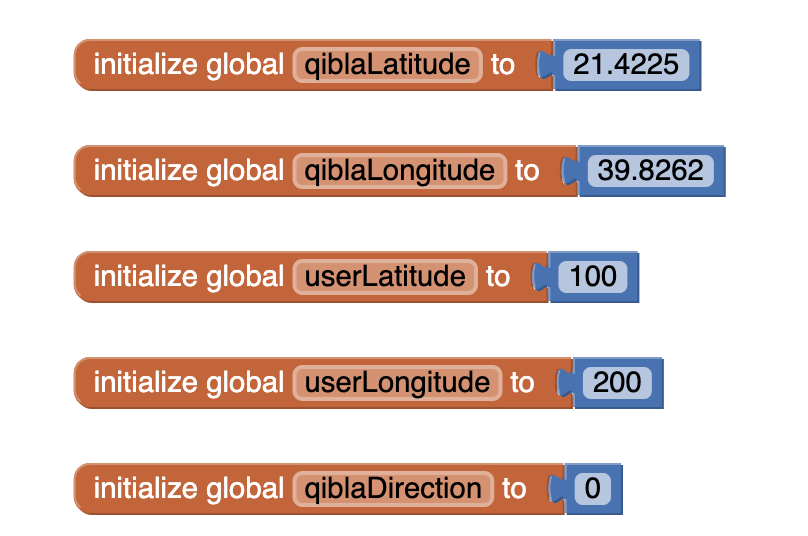
First of all, make global variables.
We are giving invalid values to user longitude and latitude so that we are able to distinguish when actual values are available. The longitude can’t be more than 180 and the latitude cannot be more than 90. When the screen is initialized, we need to ask for location permission so get askForPermission block from screen1 and choose course location.

Also, we have to align our compass image and arrow image in center of canvas. This can be achieved by dividing the width of the canvas by 2 to get the x position but we have to consider the width of the image in this calculation too so this is the resulting formula:
X position = canvas.width /2 - compassImg.width/2
Do the same thing for y and change the width to height.
Y position = canvas.height /2 - compassImg.height/2
Do the same thing for the arrowImg.

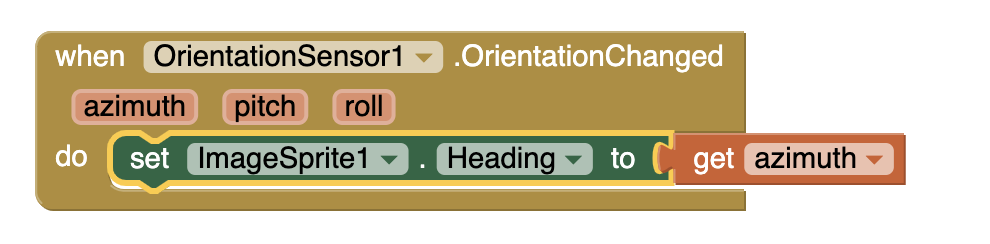
Whenever the orientation of the device changes, change the compass image heading to azimuth.
Now, we come to our qibla or location arrow. We need the user’s current location for it so we should only calculate direction if user’s location is available.

So call procedure only if valid longitude and latitude.
Let's work on the procedure now. Please copy the code carefully.

It uses a trigonometric formula to calculate the direction:
Qibla direction = atan2(y,x)
Where y = sin (qiblaLongitude - userLongitude)
And x= (Cos (userLatitude)x tan(qiblaLatitude))-(sin(userLatitude) x cos (qiblaLongitude - userLongitude)).
Source: The Qibla equation was derived by Dr. Kamal Abdali.
And then, subtract the calculated angle from true north i.e. azimuth to get the custom location direction.
Last but not least, we come to the location sensor code. When the device receives location information, the location changed event is triggered.

We are done and you can see that although the trigonometric code was a bit complicated but if you follow it carefully, it will result in a very, very cool app that you can show to friends and family and impress them. Thank you for reading 🙂.
You can have a look at the video here:


Comments
Post a Comment