Scratch Card App in App Inventor
Hello friends and welcome to Obsidian Soft
Today, I am going to show you how to make a scratch card app in MIT App Inventor.
.png)
In a scratch card app, you can scratch a card to find the hidden picture beneath it. Nowadays, this is used to make money-earning apps so you can build on this scratch card app to make earning apps or you can even make a children’s app to make them guess the hidden picture below by scratching the screen in a given time. First of all, open up MIT App Inventor. Start a new project and call it ScratchCard.Upload vertical pictures that you want to hide beneath the scratch card. For this tutorial, I am using 3 vertical scenery pictures that I will randomly hide beneath 3 differently colored scratch cards. I will also be uploading a fun logo picture in this app that I will display on my screen 1 which is basically the menu screen.
For screen1 properties, make align horizontal and align vertical both center and screen orientation portrait.
Drag and drop an image from the user interface.
Use the uploaded logo as the picture for this image.
Drag and drop a horizontal arrangement from Layout.
Make height 20% and align horizontal and align vertical both center.
Drag and drop a button from the user interface. Rename to greenCardBtn. Make the width 20%, change the text to “Green”, and make the background color green.
Duplicate the button by selecting it and pressing Ctrl +C & Ctrl + V for Windows and Command + C & Command + V for MacOS.
Rename to blueCardBtn and change the background color to blue color and text on it to “Blue”. Again, duplicate the blue card button and rename to yellowCardBtn, and change it accordingly.
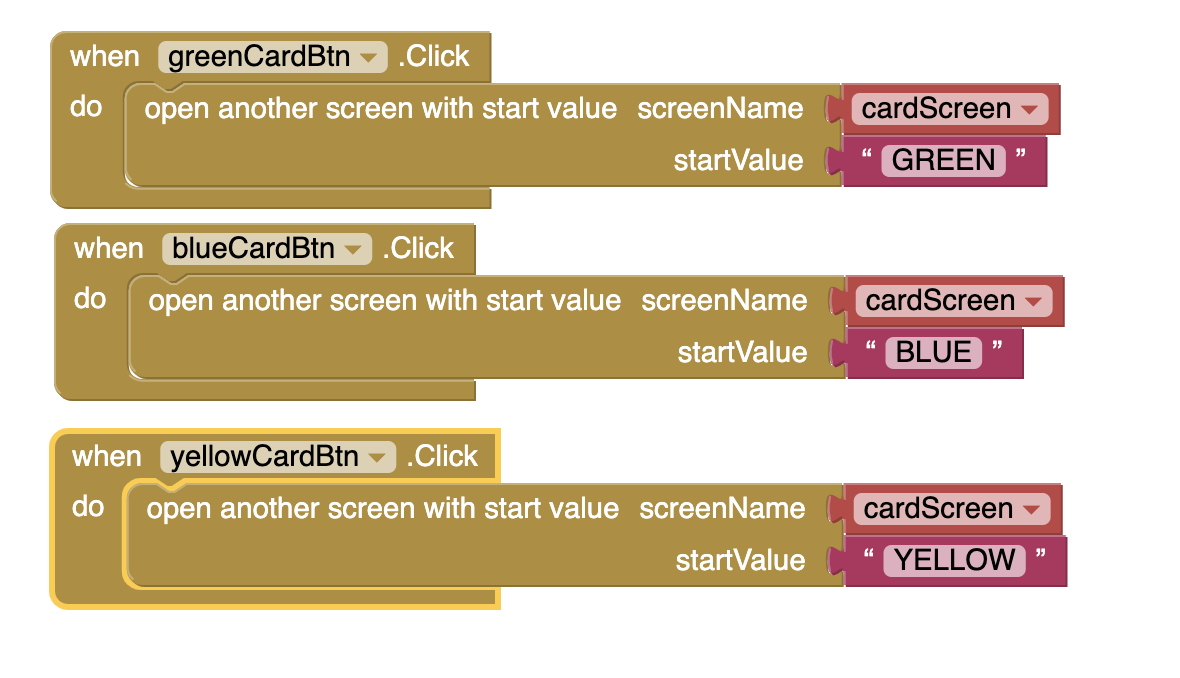
Now, we need to open our main card screen when a color button is pressed.
So, first of all, add a new screen and call it cardScreen. The designer view for the new screen will open up but go back to screen1 and then, go to the blocks section.
Whenever a color button is pressed, open the card Screen by using a block from Control called Open Another screen block with start Value. Pass the color name as a text in the start value.
Now go back to the designer view of the cardScreen.
Change screen orientation to portrait. Change the title to Scratch the card! For cardScreen’s screen properties, make align horizontal and align vertical both center.
Drag and drop canvas from drawing and animation and make height and width both fill parent.
Drag a button from the User interface.
Rename it to backBtn. Make the background color red and change the text to Back.
Now, go to the blocks section of cardScreen.
When the screen is initialized, we need to do two things: First, choose a random pic and make it the canvas background.
So, get cardScreen’s initialize event.
Initialize a local variable and name it randomNum. Assign it a random integer block from Math and choose 1 to the number of pictures as the range. I will choose 3 as the upper limit as I uploaded 3 images.
Next, get the third kind of if else block from Control, and depending on the value of the generated randomNum, set canvas’s background to a picture. So, if randomNum is 1, give it picture 1, if randomNum is 2 give it the second picture and so on and so forth.

The second thing is to paint a huge circle on this canvas to hide the picture and the color of this circle will be that of the start value sent by the previous screen i.e. screen1.
So, again, get the third type of if else block from control, check for start value and set canvas paint color to that color.

Now, we will use this paint color to draw a huge circle in the middle of the canvas so that its background picture is hidden. In the end, we will set the canvas paint color to make the color white and transparent.

When the back button is pressed, we just want to open up our screen 1 again.

When the canvas is touched, just use Canvas.drawCircle procedure to draw a circle at the point touched.

When someone drags a finger on the canvas, the canvas dragged event is triggered. In this scenario, we want to draw a line from the previous position to the current position but first set canvas.lineWidth to 15.

As you can see the dragged and touch code is identical to a doodle or drawing app code which I have taught before.
So, we are done and you can see that this app has a lot of potential.
Have fun coding this app and expanding on it to make your own unique earning or children’s app.
Download the project file:
I hope you liked this tutorial. Please like and share it.
You can also have a look at the video here:


Comments
Post a Comment