Sign up and Login in MIT App Inventor
Hello friends and welcome to Obsidian Soft!
In today’s class, we will create a login screen with a sign-up option too. Many apps require users to log in so I thought I should teach you this today. We will design a very attractive login screen for a library and I will give you tips about how you can make your login screens very eye-catching. We will use CloudDB for storage.

Let’s get started…
Open up MIT App Inventor and create a new project. Name it LoginScreen.
Upload media for the screen. I will upload this nice squarish image that I designed in Canva.

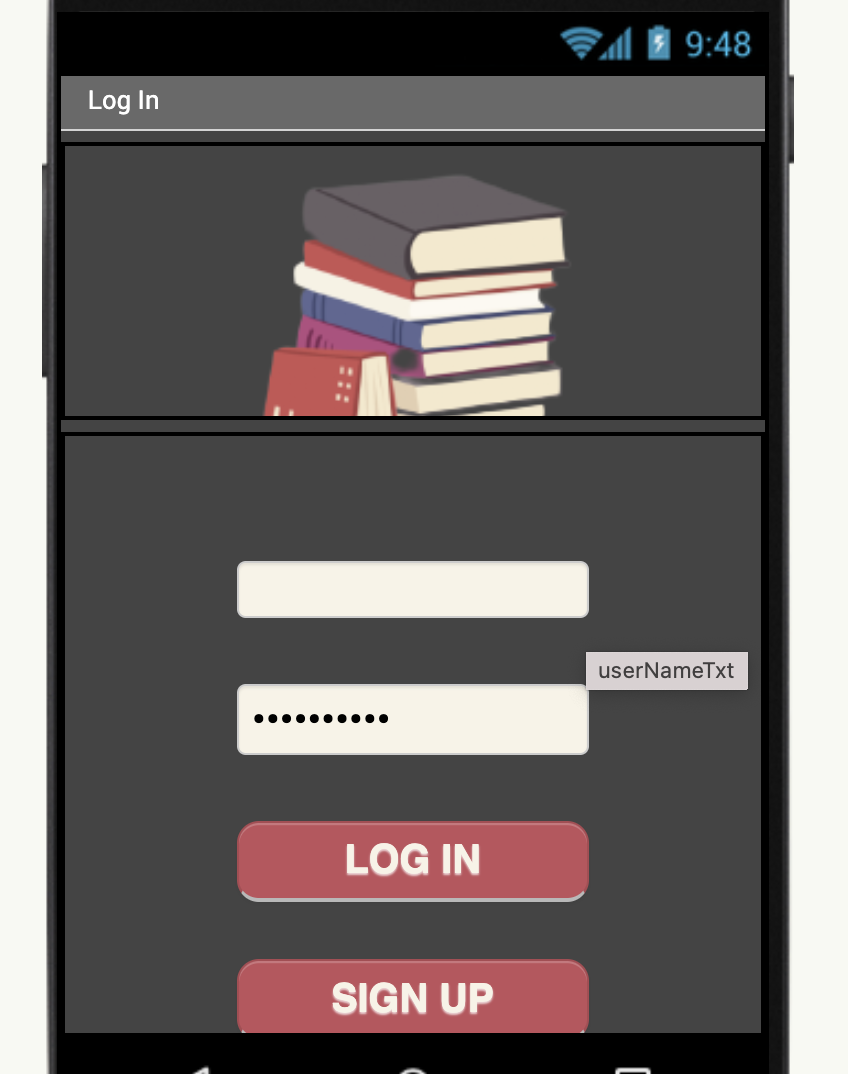
For screen 1 properties, make align horizontal center. Make the background color dark gray. Make screen orientation portrait and change the title to Log in.
Drag and drop a Horizontal Arrangement from Layout. Make it align horizontal center. The background color should be none. Height should be 30%. Width: fill parent.
Drag and drop a Vertical Arrangement from Layout below the horizontal arrangement. Make background color: none. Make align horizontal center, height 67%, and width: fill parent.
Drag and drop an Image from the User Interface inside the top horizontal arrangement and change the picture to the image that was uploaded in media.
Now, we come to our main components of the login screen that will go inside the vertical arrangement.
Drag and drop a Label from the User Interface. Name it messageLbl. Make font bold, font size 20. Height 10%, width: fill parent. Text alignment is center and color is custom: a deep red color. I got this color from the books image that I am using as a logo in the top horizontal arrangement: #bf515bff
Now, drag and drop a TextBox from the User Interface below messageLbl. Name it usernameTxt. Make the background color a custom color: an off-white color that I again got from the logo image. #f7f3e7ff. You can see how I am making my screen attractive. I made the background dark gray and now I am using colors from my logo for the components. This is the simplest way to make elegant screens.
Coming back to our textbox. Make font bold, font size 20. The hint is Username.
Drag and drop a Label from the User Interface for spacing with 3% height. Remove text.
Drag and drop a PasswordTextbox from the User Interface. It has exactly the same properties as our username text box. Same background color, font bold, font size 20 but the hint is now Password.
Drag and drop another Label from the User Interface for spacing with 3% height. Remove text.
Drag and drop a Button from the User Interface below this spacing. Rename to loginBtn. Make the background color that we used for our messageLbl i.e. red (#bf515bff). Make font bold, font size 20. Make width 40%. Make the shape rounded and text is LOG IN and the text color is our custom offwhite.
Drag and drop another Label from the User Interface for spacing with 2% height. Remove text.
Select the loginBtn. Press Ctrl+ C and then, Ctrl +V on the keyboard for Windows or command+ C and command + V for MacOS to duplicate. Rename to signupBtn. Change the text to SIGN UP.
Last but not least, drag and drop a cloud DB. We will not change properties here and we will continue with MIT App Inventor’s default cloud DB. I have already taught in a video tutorial, how you can make your own REDIS cloud account, make a custom database, and change your cloudDB properties in your project here but for beginners and small projects, default cloud DB by MIT App inventor is good enough.
Screen design is done for Screen1 and it should look like this:
Add another screen by pressing the Add Screen button.

Name it mainScreen. This screen is just a placeholder for whatever you want to do once someone logs in successfully. So, just make the background color dark gray and align horizontal and align vertical both center. Make screen orientation portrait. Change the title to The Library.
Drag and drop a label with font bold, font size 30, and text that says: Welcome to the Library. Make the font color white.
UX Design is done so let’s go to the blocks section.
Make sure that screen1 is chosen.
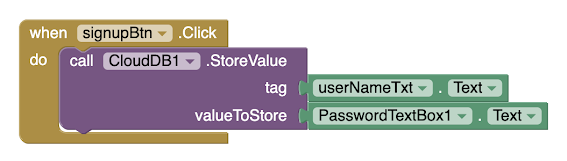
Get the signup button on click event. Call CloudDB’s store value procedure and the tag is username text and the value is password. A tag identifies data in CloudDB as I have explained to you while making our chatting app so basically we have made our user name our tag and the password is stored against it.
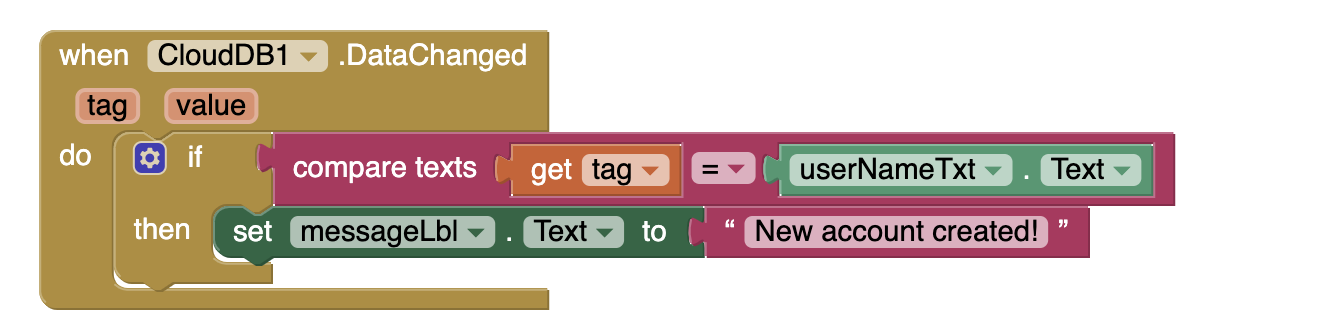
Store value call triggers the data changed event in cloud DB.
So, get that event and if the tag is equal to the username text, show a success message to the user.
For the login button, get its click event, call CloudDB’s getValue event, and give the username text as the tag.

The getValue call of Cloud DB triggers the gotValue event. So, get that event.
Here, first check if the tag is for usernameTxt. If yes, then check if the value returned by Cloud DB is equal to the password entered by the user. If equal, take to the main screen otherwise show an error message to the user.

So, this is done. However, I haven’t added any checks in it for situations like when the user presses the buttons without entering anything in username or password. Or if the user signs up with a user name that is already present in the database i.e. CloudDB. Duplicate usernames shouldn’t be allowed in real and practical signup screens. Isn’t that correct? I have taught all this in a video tutorial on my channel.
But this simple and easy login and signup screen with a beautiful, eye-catching interface is 100% done and it is perfect for beginners.
You can check out the video for this tutorial (Basic log in and sign up) on my channel too:
I hope you liked this tutorial.
If you like my tutorials, consider supporting me by buying me a cup of coffee by pressing the button below:


Comments
Post a Comment