Snake game App Inventor (PART 1) | How to make Snake Game in MIT App Inventor
Hello friends,
Welcome to Obsidian Soft!
Today, I will teach you how to make the classic Nokia snake game in MIT App Inventor. The snake will grow when it eats food. It will be able to go through screen edges to appear on the opposite side and the game will be over when its head touches any part of its body. I am sure you haven’t seen this complete snake game being made in MIT App Inventor so this will be the perfect project to impress your friends, family, and school teachers. Remember that this tutorial does require that you are comfortable with using MIT App Inventor as this is a bit more advanced than my other tutorials.
So, let’s begin…
I downloaded some control buttons from Freepik.
https://www.freepik.com/free-vector/web-buttons-set-different-colors_849039.htm

I rotated the red arrow buttons in an image editing software to get the up and down buttons too.
Now, open up MIT App Inventor, start a new project and call it SnakeGame.
Upload the four buttons in the media by just dragging all of them onto the media area.
In screen1’s properties, make screen orientation: Portrait and uncheck the titleVisible property.
From Drawing and Animation, drag and drop a canvas component onto the viewer. Make its background color black and font size: 40. Make height 68% and width fill parent.
Drag and drop a horizontal arrangement from layouts below the canvas. Make align horizontal and align vertical both center, width fill parent and height: 10%
Duplicate this arrangement by selecting it and pressing Ctrl + C and Ctrl + V on the keyboard for Windows OR Command + C and Command + V for MacOS.
Duplicate it again.
Now we have 3 horizontal arrangements below the canvas.
In the topmost arrangement, drag and drop a button from the user interface palette.
Rename it to leftBtn and in its properties, make height and width both 60 pixels and choose left.png as its image.
Duplicate this button. Rename it to upBtn and choose up.png as its image.
Duplicate upBtn. Rename it to rightBtn and choose right.png as its image.
Duplicate it again. Drag this button to the second horizontal arrangement and rename it to downBtn. Choose down.png as its image.
In the last horizontal arrangement, drag and drop a label from the user interface. Rename it to scoreLbl. Make font bold, font size 20, and change text to Score: 0
Drag and drop a button on the right of this scoreLbl. Rename it to startBtn. Make the background color red, font bold, font size 20, shape rounded, and change the text on it to Start and change the textColor to white.
From sensors, drag and drop a clock sensor. Turn off timer enabled and the timer always fires. Change the timer interval to 300 ms (milliseconds).
The screen design is done so let’s go to the blocks section.
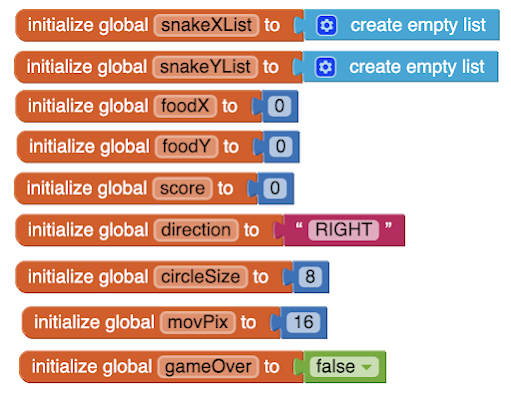
We have two lists for maintaining the x and y coordinates of our snake where the head position is always at index =1. We need to store our food’s x and y positions too. Next is our score which is initialized to 0. The direction variable contains left, right, up, or down values depending on which control button is pressed. By default, it is RIGHT. circleSize is the radius of both food and snake segments. I found 8 to be an appropriate size. Make movPix to be double this circle size value. This is the number of pixels that the snake moves in a timer event. If this isn’t double the circleSize, the snake segments will overlap which we don’t want.
We also need a gameOver boolean variable with an initial value of false. Boolean variables can only contain true or false.
Let's work on our control buttons i.e. our arrow buttons.
Now, open up MIT App Inventor, start a new project and call it SnakeGame.
Upload the four buttons in the media by just dragging all of them onto the media area.
In screen1’s properties, make screen orientation: Portrait and uncheck the titleVisible property.
From Drawing and Animation, drag and drop a canvas component onto the viewer. Make its background color black and font size: 40. Make height 68% and width fill parent.
Drag and drop a horizontal arrangement from layouts below the canvas. Make align horizontal and align vertical both center, width fill parent and height: 10%
Duplicate this arrangement by selecting it and pressing Ctrl + C and Ctrl + V on the keyboard for Windows OR Command + C and Command + V for MacOS.
Duplicate it again.
Now we have 3 horizontal arrangements below the canvas.
In the topmost arrangement, drag and drop a button from the user interface palette.
Rename it to leftBtn and in its properties, make height and width both 60 pixels and choose left.png as its image.
Duplicate this button. Rename it to upBtn and choose up.png as its image.
Duplicate upBtn. Rename it to rightBtn and choose right.png as its image.
Duplicate it again. Drag this button to the second horizontal arrangement and rename it to downBtn. Choose down.png as its image.
In the last horizontal arrangement, drag and drop a label from the user interface. Rename it to scoreLbl. Make font bold, font size 20, and change text to Score: 0
Drag and drop a button on the right of this scoreLbl. Rename it to startBtn. Make the background color red, font bold, font size 20, shape rounded, and change the text on it to Start and change the textColor to white.
From sensors, drag and drop a clock sensor. Turn off timer enabled and the timer always fires. Change the timer interval to 300 ms (milliseconds).
The screen design is done so let’s go to the blocks section.
We have two lists for maintaining the x and y coordinates of our snake where the head position is always at index =1. We need to store our food’s x and y positions too. Next is our score which is initialized to 0. The direction variable contains left, right, up, or down values depending on which control button is pressed. By default, it is RIGHT. circleSize is the radius of both food and snake segments. I found 8 to be an appropriate size. Make movPix to be double this circle size value. This is the number of pixels that the snake moves in a timer event. If this isn’t double the circleSize, the snake segments will overlap which we don’t want.
We also need a gameOver boolean variable with an initial value of false. Boolean variables can only contain true or false.
Let's work on our control buttons i.e. our arrow buttons.
Get rightBtn click event and use an if block from the control blocks to check that the direction isn’t left. If it isn’t then make it right. This is to prevent the snake from going over itself. We don’t want the collision to happen so early.

Similarly put together leftBtn, upBtn, and downBtn code. You can right-click, duplicate, and make modifications to save time.


I have used caps to avoid case errors. Make sure that the spelling is correct.
Now, let’s make a procedure for putting food at a random position on the screen. Get the first type of procedure that doesn’t return a result. Name it placeFood. In this procedure, we will not draw the food. We will just get a random X and Y value food. Remember that the food should be visible on the screen so our food’s x should be a random value between circle size and canvas’s width -circle size. Use maths block to do this. Right-click and duplicate and do the same thing for food y but make changes accordingly. Food y should be a random value between the circle size and the canvas’s height-circle size.

The next thing is our draw procedure, this will be called from the clock timer event which can also be called a game loop. We will redraw everything on the canvas after every timer event (300 milliseconds) after we have moved the snake and done other game logic.
Our snake segments and food are both circles on the screen.
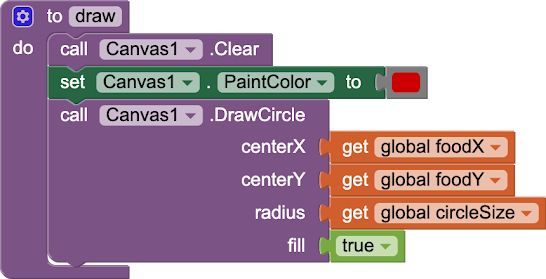
First, clear the canvas. Set the paint color to red and then draw the food circle using food x and food y. Remember that we calculate random values for food x and y in placeFood procedure. The radius is circle size which in our game is 8 and we want fill to be true.
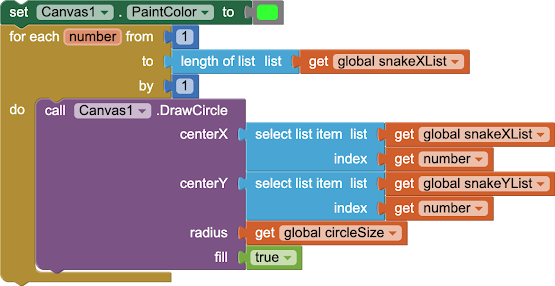
Next, we have to draw our snake. First, we change the paint color to green. Then, we will loop through our snakeXList and snakeYList and will use each x and y in these lists to draw circles.
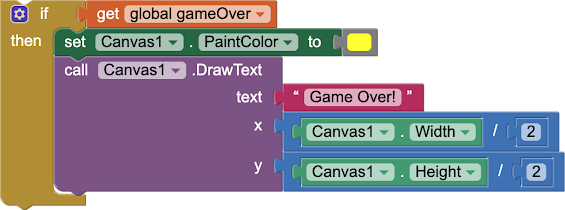
Next, we write our game over text on the canvas when our gameOver variable is true. We haven't worked on the game over logic yet. We will do it in our timer event but I want to complete the draw procedure first.
So, our final draw procedure looks like this:
Similarly put together leftBtn, upBtn, and downBtn code. You can right-click, duplicate, and make modifications to save time.
I have used caps to avoid case errors. Make sure that the spelling is correct.
Now, let’s make a procedure for putting food at a random position on the screen. Get the first type of procedure that doesn’t return a result. Name it placeFood. In this procedure, we will not draw the food. We will just get a random X and Y value food. Remember that the food should be visible on the screen so our food’s x should be a random value between circle size and canvas’s width -circle size. Use maths block to do this. Right-click and duplicate and do the same thing for food y but make changes accordingly. Food y should be a random value between the circle size and the canvas’s height-circle size.
The next thing is our draw procedure, this will be called from the clock timer event which can also be called a game loop. We will redraw everything on the canvas after every timer event (300 milliseconds) after we have moved the snake and done other game logic.
Our snake segments and food are both circles on the screen.
First, clear the canvas. Set the paint color to red and then draw the food circle using food x and food y. Remember that we calculate random values for food x and y in placeFood procedure. The radius is circle size which in our game is 8 and we want fill to be true.
Next, we have to draw our snake. First, we change the paint color to green. Then, we will loop through our snakeXList and snakeYList and will use each x and y in these lists to draw circles.
Next, we write our game over text on the canvas when our gameOver variable is true. We haven't worked on the game over logic yet. We will do it in our timer event but I want to complete the draw procedure first.
So, our final draw procedure looks like this:
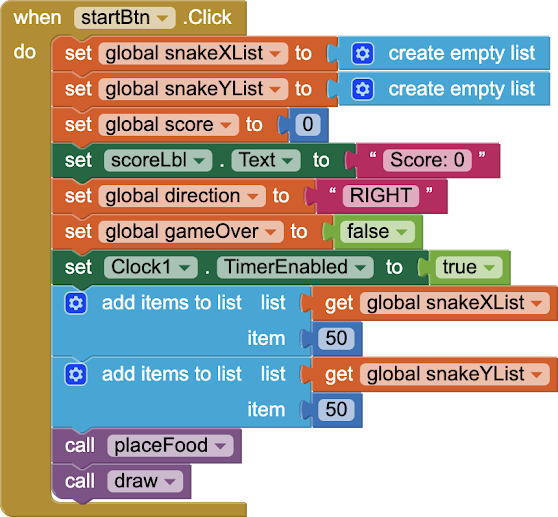
Now, let’s work on our start button code. Our start button will also work as a restart button. So, in it, we reset all our global variables to their default values. We will also enable the timer, Give a 50,50 position to head, call placeFood to get a random position for food and then call draw to draw this initial state on the screen.
We are done with part 1 of this tutorial.
We are done with part 1 of this tutorial.
You can also watch a video for this here:
Please like my videos and share them with your friends and family. Also, subscribe to my channel and press the bell icon so you don't miss any of the great projects I have planned for you.https://www.youtube.com/c/obsidiansofteducation
Please like my social media pages for more educational resources and tips.
Facebook: https://www.facebook.com/ObsidianSoft/
Instagram: https://www.instagram.com/obsidiansoftapps/
Pinterest:
For links to free educational apps, have a look at the educational apps page
.png)


Comments
Post a Comment