Upload ANY file to Google Drive in MIT App Inventor Part 1
Hello friends and welcome to Obsidian Soft,
In this tutorial, I will show you how to upload any file that you create in your app to a folder in Google Drive.
.png)
So, let’s start with this project. In this tutorial, I will work on the camera part from start to finish, and in the next tutorial, I will teach you how to upload sound and text files by making a generic procedure for uploading ANY file to Google Drive from MIT App Inventor.
First of all, we need an extension for doing a special encoding of our files before uploading them to Google Drive.
http://kio4.com/appinventor/277i_extension_imagen_string.htm
Choose the one that says: com.KIO4_Base64.aix
Open up MIT App Inventor and start a new project.
Upload the downloaded KIO4 extension and drag and drop it onto the viewer.
Let’s design the screen for the camera part:
For screen1 properties, make align horizontal center.
Drag and drop an Image component from the User Interface palette onto the viewer.
Make height: 50% and width: fill parent.
Drag and drop a Horizontal Arrangement from the Layout palette below this image.
For its properties, make align horizontal and align vertical both center. Make height:13% and width: fill parent.
From the User Interface palette, drag and drop a Button inside this horizontal arrangement.
Rename to takePicBtn and change the text in its properties to Take Pic.
Drag and drop another Button inside this horizontal arrangement.
Rename to uploadPicBtn and change the text in its properties to Upload Pic.
From the Media palette, drag and drop a camera component. We need this for taking photos.
And from Connectivity, add a web component.
From Sensors, add a clock sensor. We need this to generate our unique file names by adding timestamps to them.
Go to the blocks section.
Make global variables for scriptUrl and FolderId and give them empty text blocks.
First, let’s work on our script.
Don’t be daunted by these steps. If you follow me very carefully, it will not be difficult.
Open up Google. Search for "Google app scripts" in Google. We need to write some code in a programming language called Javascript so that we can connect with Google Drive. Go to the first link in search results.
I will also give this link in the video description.
https://www.google.com/script/start/
Press the button Start Scripting.
Press the button for a new project and rename the project to Upload To GDrive.
Copy and paste the following script in the given box:
function doPost(e) {
var data = Utilities.base64Decode(e.parameters.data);
var blob = Utilities.newBlob(data, e.parameters.mimetype, e.parameters.filename);
var fileID = DriveApp.getFolderById(e.parameters.folderId).createFile(blob).getId();
return ContentService.createTextOutput(fileID);
}
Press on the deploy button. Choose the New Deployment option.
(***If at some later time, you edit your script i.e. the code written above, you need to redeploy by choosing "Manage Deployment" instead of "New Deployment" and increase the version. Every code change in the script requires redeployment)
Click on the settings cog wheel, choose Web app, and change “who has access” to Anyone. Press on the deploy button.
Now, press the Authorize Access button. Choose google account and allow your project i.e. Upload to GDrive to change Google Drive.
In the end, you will get a web app URL. Copy and paste it inside the scriptUrl global variable in your app inventor block section.
We also need a Folder ID for our Google Drive. So, open up your Google Drive.
You might need to choose the Google account whose drive you want to upload to.
Now right-click on Google Drive on the left-hand side and choose new folder. Rename appropriately. I am going to name it UploadFromAppInventor.
Now, it is super important that we allow that anyone can write to this folder, and for this, we need to share this folder. So, right-click on the newly created folder and choose share. A dialog will open up. Change general access to anyone with the link and change the role to Editor.
Again, all these steps are super important and not a single step should be missed.
Now, press done and double-click on the folder to open it. Copy its folder ID which is a mixture of letters and numbers after the last forward slash from the address bar in the browser. Now, come back to your project in MIT App Inventor and paste it in the block section for the global variable folderId.
Now, we need a few more global variables:
imageToUpload will contain the file path of the picture taken by the camera.
fileName will contain the unique file name for our image so that images are not overwritten in Google Drive.
mimeType will contain the media type of file.
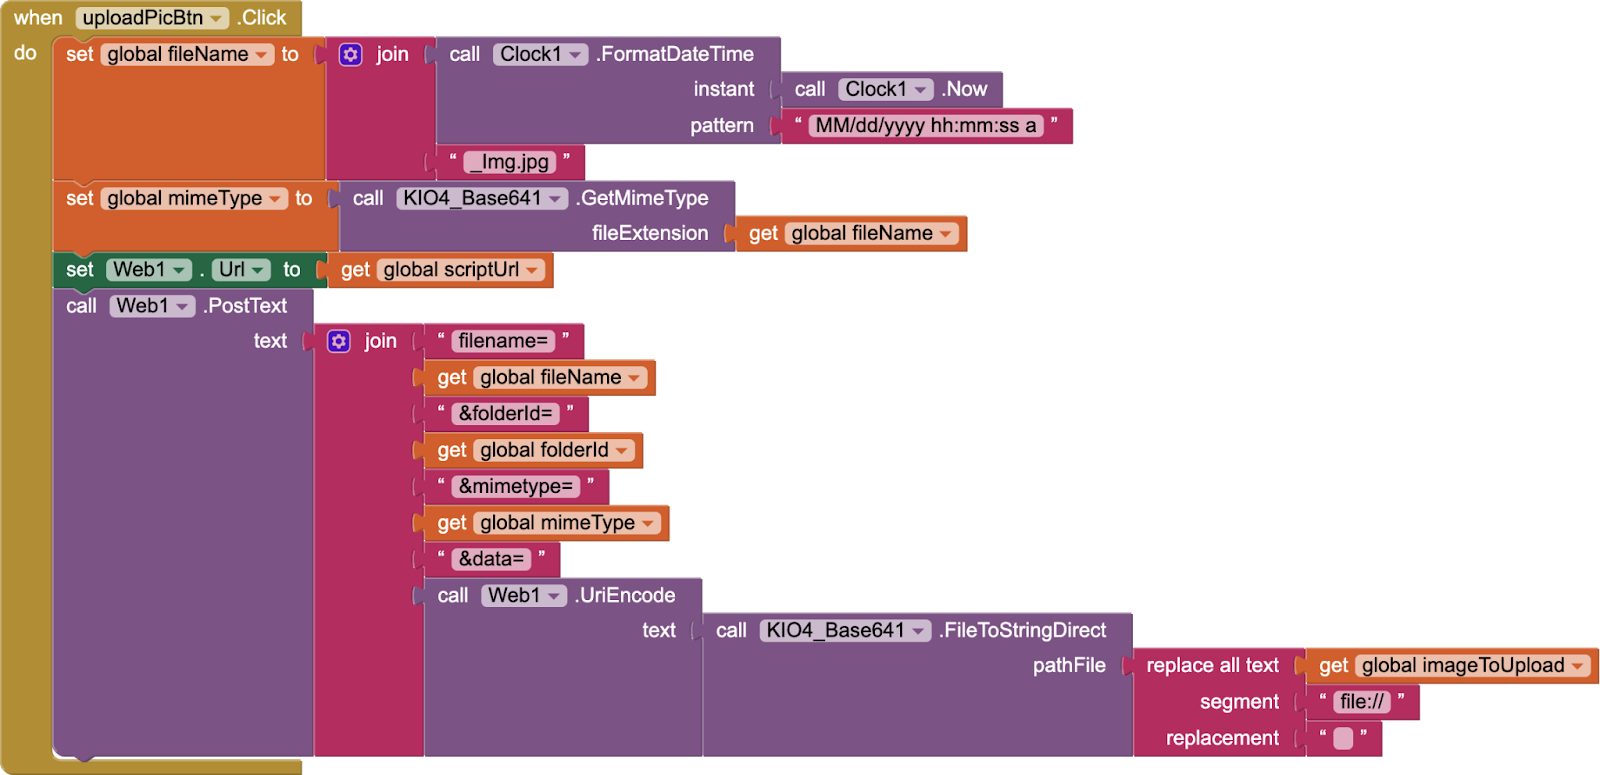
When takePic button is clicked, call the camera component’s procedure TakePicture.

This procedure will trigger the event AfterPicture of the camera so get that event and set the image1’s picture to show the picture taken by the camera. This will be shown rotated in the app but will be uploaded properly to Google Drive.
Also, set the imageToUpload variable to the image too.

I have already explained in my camera app tutorial that this image variable in the AfterPicture event is not the actual image but the file path for the image file so the imageToUpload now contains the path of the picture taken by the camera. Once the user is satisfied with the picture taken, he/she can press Upload Pic button to actually upload it to Google Drive so get the click event for the uploadPic button.

First, we are going to generate a unique file name for our image so set the global fileName to a join of the current time and a text block that says _Img.jpg.

Next, set the mime type to the appropriate type. I am trying to make it as generic as possible as later on we have to add uploading of text files and audio files to this app too so let’s get the mime type programmatically instead of hard coding it by using our very cool extension. Add this after the setting of fileName in uploadPicBtn click event.

Set the web component’s URL to the global script URL after setting the mimeType in the uploadPic button click event.

Next, we have to post Text to our web1 component in which we actually send the image data to Google Drive.
So, call web component’s PostText procedure.
The text will be a join from Text blocks with 8 slots so click on cogwheel and add more slots to join block.
Now, be very careful in filling up this join.
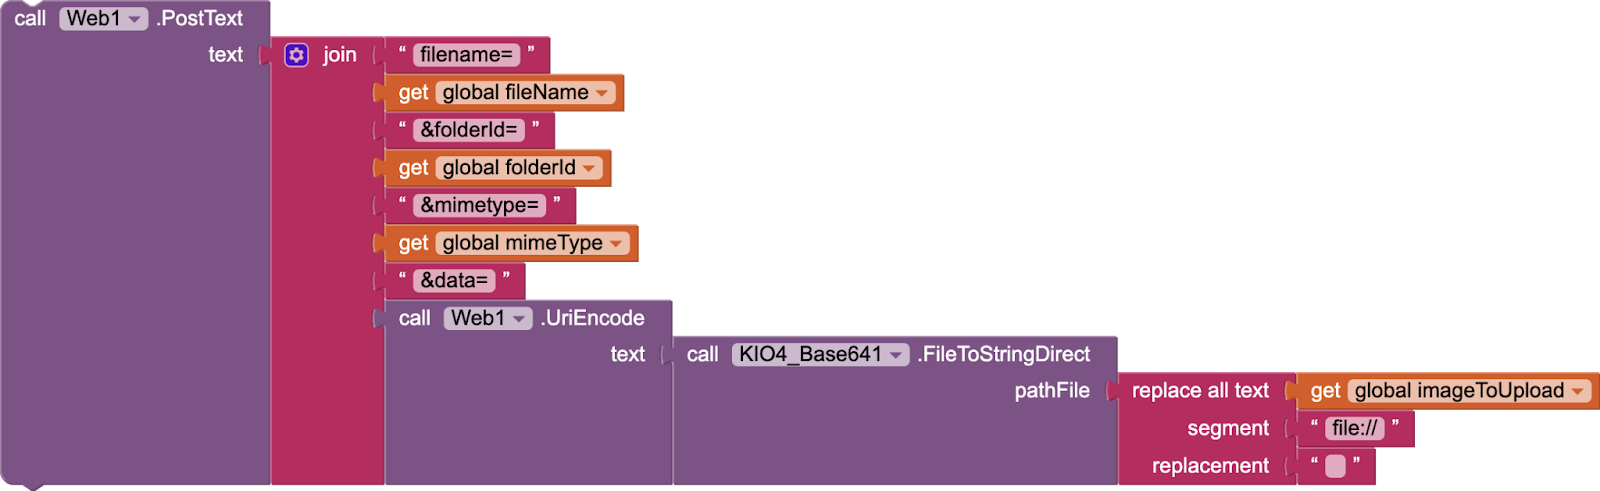
The first slot is a text block that says filename= in lowercase
The second slot is the get block for our global variable fileName
The third slot is a text block that says &folderId=
Remember that I is capital in this word. Basically, we are following the exact code that we wrote in our script.
The fourth slot contains the get block for our global variable folderId.
The fifth slot is a text block that says &mimetype=
The sixth slot contains the get block for our global variable mimeType.
The seventh slot is a text block that says &data=
The eighth slot is important as we have to encode our image here.
So, call web1’s UriEncode procedure, and in text, we use our extension for encoding to Base64. We use the fileToString Direct procedure that takes in a file path. Now this file path expects an absolute path but there is a problem with our imageToUpload path. If I had used a notifier to see what is inside it, it would have shown me a file path looking like this file:///storage/emulated…. We need to trim this file path and remove file:// so that it becomes something like this: /storage/emulated... So, we replace the file:// in imageToUpload with an empty text block by using the replace block from text blocks.
Our final uploadPicBtn click event looks like this:
And we are done with the camera picture taking and uploading to Google Drive.
Download aia file for this part
My next tutorial will be a continuation of this tutorial and we will work on adding sound and text uploading to Google Drive to it and making it more generic so that we can effectively upload any file to Google Drive using the same procedure.
If you like my classes, consider supporting me by buying me a cup of coffee by pressing the button below:

You can also watch the video tutorial for this part on my channel: Obsidian Soft.


Comments
Post a Comment