Weather App in MIT App Inventor
Hello friends,
Welcome to Obsidian Soft. Let’s make a weather app in MIT App Inventor today.
.png) Unlike other tutorials you might find online, we will not use an extension. I try to avoid extensions as much as possible as extensions don’t work on iPhones.
Unlike other tutorials you might find online, we will not use an extension. I try to avoid extensions as much as possible as extensions don’t work on iPhones.
We will use an API i.e. application programming interface and use the API by WeatherAPI.com.
https://www.weatherapi.com/
You will need to make an account to get an API key. Remember we did the same thing while making our ChatGPT apps i.e. we made an openAI account to get an API key. The process is quite similar so make an account by pressing on Signup button.


 After verifying your email, just log in.

Welcome to Obsidian Soft. Let’s make a weather app in MIT App Inventor today.
.png)
We will use an API i.e. application programming interface and use the API by WeatherAPI.com.
https://www.weatherapi.com/
You will need to make an account to get an API key. Remember we did the same thing while making our ChatGPT apps i.e. we made an openAI account to get an API key. The process is quite similar so make an account by pressing on Signup button.

You will need to provide a valid email address along with a password.

You will also need to verify your provided email address by clicking on the link sent to your email.


You will be taken to your account's dashboard.


The following is the call sent to the WeatherAPI server when we press the Show Response button.
https://api.weatherapi.com/v1/current.json?key=3575453b7f43409485540610&q=London&aqi=no
Scroll down until you see the response body.


Copy the API key and go to API Explorer as we want to see how the API responds to requests from apps.

Paste your API key in the provided field. As you can see, we can provide a city name along with API key and it will return the response in JSON form (Javascript Object Notation). APIs usually return responses in this notation and the apps have to interpret this JSON. Thankfully the JSON returned by WeatherAPI.com is fairly simple and we can have a look at a sample of it by pressing the Show Response button.

The following is the call sent to the WeatherAPI server when we press the Show Response button.
https://api.weatherapi.com/v1/current.json?key=3575453b7f43409485540610&q=London&aqi=no
Scroll down until you see the response body.
As you can see it is returning dictionaries. We are interested in the dictionary that we will get if we provide the key=” current”. We will use this dictionary to get the temperature by giving temp_c or temp_f as the key. I will use temp_c i.e. temperature in Celsius in this tutorial.
To get the weather description along with its icon, we will get the dictionary for the key “condition” inside our “current” dictionary and use the keys “text” and “icon” respectively to get the values. Don’t be confused as I will show the exact blocks too. Go to docs and click on error codes on the left-hand side.


This shows that our response code is >=400 in case of error.
Now, let’s go to MIT App Inventor. Create a new project and call it WeatherApp. For screen1, make the background color dull blue, align horizontal and align vertical both center.
Add a horizontal arrangement from Layout. Make align horizontal and align vertical both center. Make height 20%
From the user interface, drag and drop a label inside this horizontal arrangement. Rename to cityLbl. Make font bold, font size 20, and text color: white.
From the user interface, drag and drop a textbox inside this horizontal arrangement after the label. Rename to cityTxt. Make font bold, font size 20, and change the hint to “Enter city name”
From the user interface, drag and drop a button inside this horizontal arrangement and put it on the right of cityTxt. Rename to submitBtn. Make the background color white, font bold, font size 20, and shape rounded.
From the user interface, drag and drop an image below this horizontal arrangement. Rename to weatherIcon.
From the user interface, drag and drop a label below this image. Rename to descLbl. Make font bold, font size 20 and text color: white.
From the user interface, drag and drop a label below this descLbl. Rename to tempLbl. Make font bold, font size 50 and text color: yellow.
Last but not least, from the Connectivity palette, drag and drop a web component onto the viewer. This is an invisible component that will be used to communicate with the WeatherAPI servers. Our final screen will look like this along with the components:


Let’s go to the blocks section.
Make a global variable for our API key and response returned by servers. Don’t use this API key. You need to get your own key and process has been explained above.
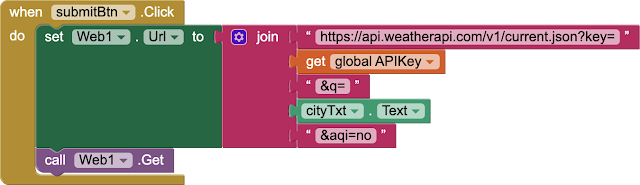
Next, we get the onClick event for the submitBtn and set up the URL for sending a request to WeatherAPI.com, and then give a call to get a response from their servers.
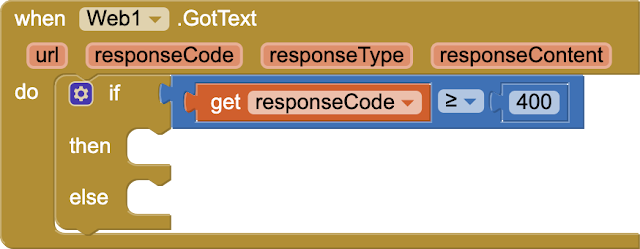
The Web1.Get results in a Web1.GotText event once we receive a response from the server
Next, drag and drop an if/else block from Control inside this event and check whether reponseCode is >=400 (remember that this means an error)
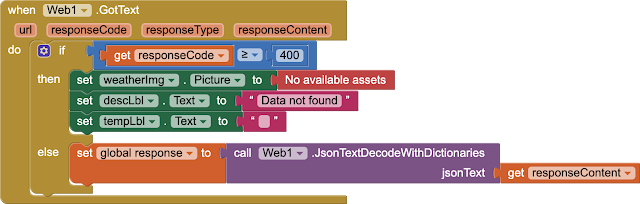
In case of error, we will not decode the response but make our result empty with a data not found message for the user. 
In the else condition, we will first decode the response using a special JSON decode procedure of the Web component and put it inside our global variable response.
Now, we have dictionaries inside our response variable.
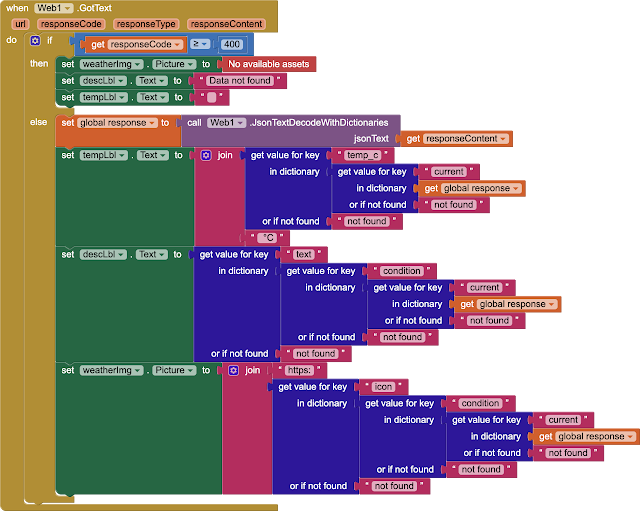
First, let’s get the temperature and put it inside our tempLbl.
We will need to do a join with the symbol of Celsius before putting it inside userLbl.
Next, set the descLbl to the value for key:”text” in the “condition” dictionary that is inside the “current” dictionary.
Do the same thing for the weatherIcon but instead of key: “text”, use key: “icon” and before setting the value to weatherIcon, use a join with text string http: to construct a valid web address to get the image from Weather API servers.
This is done and our basic weather app with a nice clean and attractive user interface is ready.
I hope you have as much fun making this app as I had while designing and making it for you.
Again, you don’t need any extension for this weather app. Just make a free account on WeatherAPI.com and you are good to go. If you like my work, please share it with friends and family and if you haven’t subscribed to my channel yet, kindly do so so that you don’t miss any of the great projects that I have planned for you.
In the end, I would like to thank the amazing people at WeatherAPI.com for making such a user-friendly API.
Thank you for reading this tutorial. If you like my work, please support it by buying me a cup of coffee. Just click on the following link:
You can also have a look at the video here:
Please like my videos and share them with your friends and family. Also, subscribe to my channel and press the bell icon so you don't miss any of the great projects I have planned for you.
Please like my social media pages for more educational resources and tips.
Facebook: https://www.facebook.com/ObsidianSoft/
Instagram: https://www.instagram.com/obsidiansoftapps/
Pinterest:
https://www.pinterest.co.uk/obsidiansoft/_created/
For links to free educational apps, have a look at the educational apps page


mengapa saya ada muncul error pesan not found, https:not found saat aku sudah mengisi nama kota dan klik button?
ReplyDeleteMake sure that you are providing the correct API key. As written in the tutorial, you have to get your own API key. The API key in this tutorial is not correct and is just for example. Also, the url should be exactly set the same way in the submit button click event as i have written in the tutorial.
Delete